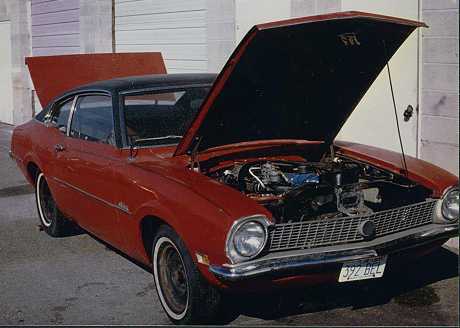
1 As purchased, it looked a bit forlorn but there was NO rust anywhere. I mean that: NO RUST with all original solid red paint (badly faded) except for a spot repair on the passenger door!
2. Check out the straight body and the goofy aftermarket side trim (riveted on, unfortunately). The worst dent was a crease in the lower left rear quarter panel, below the character line.
3. Here's the engine compartment as the extensive mechanical rejuvenation was just being finished. There is a lot of detailing here, and a bucket load of fresh NOS parts, too. That's a head shield
under the carb to protect it from the heat generated by the Clifford headers which have been aluminum sprayed. 4. If you look carefully, you can see the deteriorating vinyl top and
the exhaust poking out from under the rear bumper (the rear valence was with George Layton here for custom work). Those are the Appliance slotted mags from my first Maverick fitted with sticky Goodyear GT+4 radials.
5. Compare this customized front valence to a stock unit. George Layton carried out my design to narrow the stock opening, using the stock curves/radius, and filling in the blank with sheet-metal. My
son, Eric, holds the part. In this shot, the second coat of the PPG catalyzed primer has just been block sanded, waiting for the final coat of primer. This car will be black so the bodywork must be impeccable!
 |
7. Since the engine compartment and chassis were totally finished and detailed at this stage, it was quite a chore to entirely cover the chassis with 15-mil plastic and cover the interior, also. PPG's two-part primer surfacer was used exclusively.
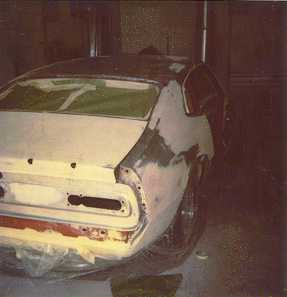
8. Here is a detail shot of the right rear quarter panel with the quarterpanel extension replicated in metal and then welded on (the smoothed quarter panel extension were added after the body was initially primed). While the body work has been significant, it doesn't look extensive.
9. The trunk needed to be smoothed. So, George Layton precisely replicated the factory fiberglass trunk spoiler in sheet metal and MIG-welded the new part to the trunk and then smoothed out the interface. The only drawback is that the trunk is heavy, and must be supported with GM struts when the car is finished.
10. In another view, the trunk is really cool! The underside is being finished just like the top side lots of block sanding and so forth. The factory Grabber spoiler has been replicated in sheet metal and welded to a NOS trunk.
 11. I have always hated the standard issue late Sixties Ford door handles. So, I asked George Layton to install '88 Escort door
handles. He purchased two doors from the junk yard, cut out the affected area and welded it to the Maverick doors.
11. I have always hated the standard issue late Sixties Ford door handles. So, I asked George Layton to install '88 Escort door
handles. He purchased two doors from the junk yard, cut out the affected area and welded it to the Maverick doors.
12. NOS handles and interior hardware are used. Neat, eh?
13. With the wrong trunk mounted here, check out the smoothed rear quarter panel. In its second coat of primer, the change is subtle but significant. Also check out the absence of the rear quarter panel marker lights and the flared rear valence that has been welded to the body.
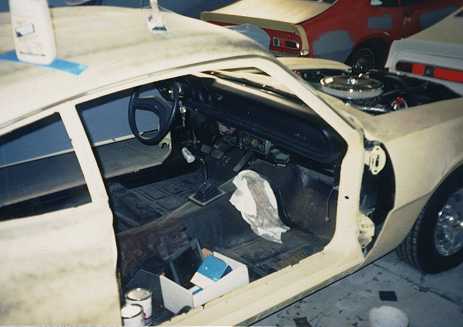 14. Though the floorboard was rust free, it was thoroughly cleaned
and then treated to a thick coat of black Rustoleum. Before the carpet goes in, modern thermal/sound deadening sheets will be installed. Note the restored dashboard, with Ford replacement black steering wheel.
14. Though the floorboard was rust free, it was thoroughly cleaned
and then treated to a thick coat of black Rustoleum. Before the carpet goes in, modern thermal/sound deadening sheets will be installed. Note the restored dashboard, with Ford replacement black steering wheel.
15. '69
Cougar taillights will be installed. These units, along with three sets of mint used lenses, were acquired from a vendor in Hemmings. Contemporary electronic switching units, available from Tony Branda Mustang, will handle the sequential switching task. Here, my son Eric holds up one Cougar lens to the car. These lenses will be installed from behind the rear panel, without the factory chrome bezels but will not reach side-to-side. The filler piece between the two lenses was made by George Layton, and will be welded to the taillight panel between the inside of both the right and left inside extensions of the taillights. No stock Cougar grille work will be used. The gas will be filled from inside the body in the time-honored customizing tradition! has been made from sheet metal and welded to the body.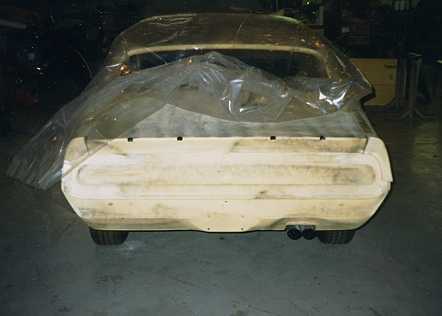 |
Photo Essay: Rough In of '69
Cougar Taillight installation